Thursday, September 28, 2006

The Clown Bike

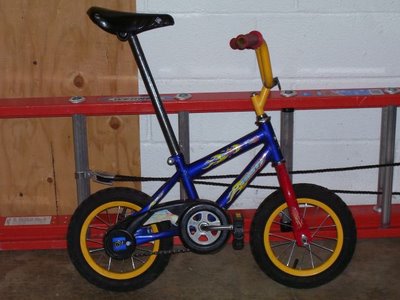
This is my Clown Bike. It was my son's first bike, but he outgrew it. We were going to give it to St. Vincent DePaul, but I noticed just how sturdy the thing really is, and decided to keep it for fun. I raised the seat, added real pedals, and tightened up the spokes a little, but it's stock the rest of the way. He always cracks up when I ride it - maybe because I'm not exactly a little guy myself.

The CG seems a little far back, but by the time you lean over to grab the handlebars between your knees, it's just about right. I just wish it would go a little faster (which was always his complaint, too - his legs just couldn't spin any quicker).


Enter the $3 garage sale bike! I've been wishing that I had a smaller front gear for my recumbent, to give a little lower gear for hill climbing, and was pondering my choices this evening. The current smallest gear is 39 teeth. I looked at the (36 tooth) gear from the $3 bike, and decided it wasn't small enough.

Then I noticed the Clown Bike has a much smaller gear (28 teeth). I did some measuring and found that the crank and gear from the $3 bike will fit the clown bike, giving it the much desired boost in speed (due to more chain being pushed for each turn of the pedals).

It also lets me use the 28 tooth "clown" gear for my recumbent - which is more what I had in mind. I'll have to do some modifying to assemble the gears into a triple pack, but it'll be worth it.
This will change my lowest gear-inch value from 36.2 to 26.0. This translates (at 80 pedal revolutions per minute) to a change from a low speed of 8.6mph to 6.2 mph. Nice.

I cut and bent a few tubes for the seat tonight. I'm kind of nervous about the seat, because it is such a prominent feature. I guess I should just relax, and take the attitude that if I don't like the way it feels, I can always replace it very easily later on, improving upon my first design. The important thing right now, is to have something to sit on so I can keep moving forward.

Jack

Labels:

Friday, September 22, 2006

Things Kids Say

These are things my daughter has actually said after being in school for three weeks.

"That's my gym teacher over there."
"Oh really? What's her name?"
"I don't know. But she sure blows that whistle a lot."

"Nathaniel can't read."
"Who's Nathaniel?"
"He's the boy that sits next to me."
"You're in 4th grade - what makes you think he can't read?"
"Well, whenever we trade papers to grade our work, he marks all my answers wrong."
"Maybe you should work on your penmanship."
"No, boys just can't read."

"That's Peter over there." (pointing across the parking lot)
"Oh? Is that one of your friends?"
"Are you kidding? He ate two fortune cookies at lunch today, but he didn't take the fortunes out first!"

Jack

Labels:

Wednesday, September 20, 2006

More Bike Work

I really hope this doesn't get boring, hearing me yak about my bike all the time, but it really is about the only thing that has happened the last few days worth mentioning here in this sophisticated forum. It's not that it's going to be such a great bike, but it's lots of fun to build.

I've spent about 2 hours total this week finishing the welds (I'm getting much better), then prepping the frame for primer. I want to have the frame ready to paint before I assemble it next time to mount the seat and handlebars. Then I can test ride it as soon as I put the seat and handlebars on, then disassemble, paint and reassemble it for proving.

I also need to get a tubing bender to start working on the seat frame. I think just a conduit bender will work, but I don't want some cheap piece of junk that has a rough finish on the inside of the groove. I want nice smooth bends that are ready to paint. Maybe I'll just get the $15 conduit bender and polish the inside of the groove.

I found this cool bell by following a link from The Recumbent Blog. I think I'll order it for my bike. It would work well in the right side of my handlebars, with a mirror mounted in the left side.

Jack

Labels:

Tuesday, September 12, 2006

Grinding Away

Tonight I cleaned up a few welds on my recumbent frame (most of them needed some kind of touch up). There are two I need to weld again - I just don't think they have enough penetration to trust with supporting my ampleness as I ride like a madman.

The next phase will be the seat. That will take some thinking, and lots of studying pictures on the net. I looked at paint today. I'm no painter, so I'm planning on rattle-canning the whole thing. Red frame, black and chrome components, black seat, black stem and handle bars, and a pasty fool riding it.

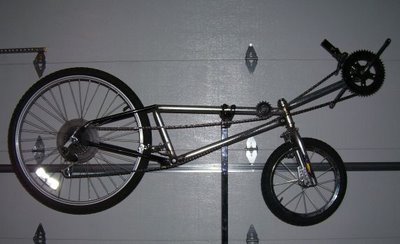
I really like the paint job on this bike, but I'm sure they don't use spray paint. It's nothing fancy, just a good looking basic paint job to make a simple bike look great. It just looks like it wants to go for a ride, doesn't it.

Jack

Labels:

Saturday, September 09, 2006

Bike Progress

Yes, we have a drive train! I was very busy this weekend and made some great progress. I installed standoffs for the upper guide roller, and both lower guide pulleys. I also tacked a stand pipe on the drive bracket to hold the front derailleur. I put a few old chains together, and tested the setup to make sure it would work. I'm not totally happy with my decision to use plastic idler pulleys in the lower run to inhibit the bouncing of the chain. They are a little noisier than I thought they'd be, and give a hell of a vibration. I might ditch them later for the rubber skate wheels since they don't have any real tension on them. The gear in the top run works great.

I installed a mount for the rear brake, and made sure it would work as I planned. Then I disassembled it again, and started cleaning up my amateurish welding job. There are a couple places that need to be ground off and rewelded, and a couple places where I probably could have done better if I had just closed my eyes. I think the hardest part of mig welding so far is being able to see what I'm doing - the gun hides so much. Anyway, I have much more to do, before assembling it the next time. I also still need to build a seat, which will be a challenge due to so many variables and arbitrary things like wide butt, skinny butt, lumbar support, shoulder support, tilt, back length, adjustability...

I started to add cable nips to allow naked cables for the long straight runs, but after tacking one on, decided to bag that idea and just have the flexible housings run the full length of the cable. It really wasn't worth the extra work for......why do they do that anyway? I mean how much weight do you really save? I can't see how it reduces friction in the housing, since the friction occurs at the bends, and you haven't eliminated any bends.

I'm sure that when I'm done with this project, I'll look back on it and have to conclude that I know nothing about bicycles, welding and design. But maybe that's not the real goal here. It's a chance to learn to weld, and to play around with bikes. It's also a chance to build something myself, and to use my tools which otherwise collect dust in the garage. But more than that, it's something positive in a world that sometimes seems pretty dismal. My bike is always there waiting for me to come out and play, and it will always be as good as I want it to be.

Jack

Labels:

Wednesday, September 06, 2006

Recumbent Chain Gear


I found an easy solution to a small problem in the design of my recumbent. The top side (tension side) of the chain was too close to the botom of the seat when the slack was taken out of it. Some recumbents use a rubber skate wheel here, but that seems to me to be a poor choice, due to the amount of tension on the chain causing rapid wear in the wheel. Others use a small idler pulley from a rear derailleur, but that seems to me like it would produce a chattering feeling under strenuous pedaling due to it's small diameter (and resulting small number of teeth in contact with the chain).

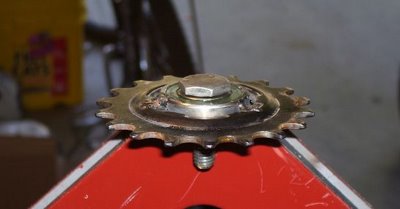
So, my solution was to remove the rear gear from a small child's bike (that I bought at a garage sale - geeeze, give me a break). It was about 3" in diameter, with a nice 1.25" hole in the center. By chance I had a roller bearing with a 1.25" outdside diameter, which I had removed from a fitness trainer (that I turned into a bike maintenance stand, but that's another blog story for another day). The gear fit perfectly over the bearing, so I tack welded it on. Digging through a tackle box of old hardware that I keep under my workbench, I found a shouldered bolt that fits the inside diameter of the bearing perfectly, and is just the right length to allow me to add a chain keeper under the head of the bolt.

The gear is large enough to handle the chain smoothly, even when very tight, and hard enough to not wear out quickly. Now all I have to do is weld a nut onto a standoff where I want the pulley to be located, and the chain will be pulled down to clear the seat bottom. I think that location will be just aft of the steering tube along the top tube (see the picture below). Any further forward, and I would run the risk of sucking brake and shifter cables into the gear when turning sharply.

My only concern is that the outer race might have overheated during mig welding. I removed the grease seals first, kept the welds quick, allowed some cooldown time between welds, and oiled it well before reinstalling the seals. It feels ok now, but time will tell. If it fails, I might need to heist another kids bike - I have a spare bearing.

Jack

Labels: